Creating multiplayer levels (GTA2)
Main Page > GTA2 > Modding Tutorial > Creating multiplayer scripts
To create multiplayer levels, you need to make sure your map and script are suitable.
Contents
Converting singleplayers levels
Multiplayer levels differ from singleplayer levels in a few ways, but singleplayer levels can be quite easily converted to make them suitable for multiplayer. To do this, you first need to strip the script from all unnecessary features like missions, Kill Frenzies, gangs, etc. In fact, a lot of these features aren't really impossible in multiplayer, but you won't encounter them in a standard multiplayer level.
Multiplayer codes
When you have a script without all the unneeded code, you can add the missing multiplayer codes. When it's ready, you can compile it just like a normal singleplayer script.
Player peds
First of all, a multiplayer script logically needs more than one player, so you have to add some PLAYER_PED commands to the script. There is a maximum of six players, but it is possible to create multiplayer scripts with only one player. Don't forget to give each player a different outfit. Also, use the gang-outfits (5, 6, 7, 8, 9, 10 and 11) because these outfits use different colored arrows in stead of the big purple one.
You don't have to create a separate script for each playercount; The game ignores unused player peds. However, you do have to create separate scripts if you use complex codes that refer to player peds. The game crashes if the script tries to manipulate unused player peds.
Example
PLAYER_PED Playera = ( 126.5 , 54.5 , 2.0 ) 8 90
PLAYER_PED Playerb = ( 55.5 , 203.5 , 2.0 ) 10 180
PLAYER_PED Playerc = ( 165.5 , 100.5 , 3.0 ) 11 270
PLAYER_PED Playerd = ( 128.0 , 207.5 , 2.0 ) 13 180
Weapons
Weapons in a multiplayer level are mostly created with GENERATORs, so that they keep spawning during the game. Do not script a weapon spawn on a player spawn point. A weapon spawn on a restart zone isn't a problem.
Creating a *.mmp file
Multplayer levels aren't installed with the test1.seq file like singleplayer levels, but with *.mmp files. Each multiplayer level needs as many *.mmp files as player counts (for instance, a level playable with 2, 3 and 4 players needs three *.mmp files).
Open notepad and copypaste the following:
[MapFiles]
GMPFile = map_name.gmp
STYFile = style_file.sty
SCRFile = script_name.scr
Description = Name of the level
PlayerCount = playercount
| map_name | The name of the *.gmp file |
|---|---|
| style_file | Which style file to use: wil, ste or bil |
| script_name | The name of the *.scr file |
| Name of the level | The name of the level which appears in the GTA2 Manager. Don't forget to add the playercount to the name so the number of players is visible in the drop down box. |
| playercount | The ammount of players: 1, 2, 3, 4, 5 or 6 |
Save this file as level_name.mmp. You don't have to compile this file; just put it in the data folder.
Example of tst-4p.mmp
[MapFiles]
GMPFile = tst.gmp
STYFile = wil.sty
SCRFile = tst-4p.scr
Description = Test level 4P
PlayerCount = 4
Multiplayer level design
Level design is very important when making multiplayer levels.
Size
It is not recommended to make large maps. Large maps tend to be repetitive and it is hard to find your opponents and weapons, which causes players to spend more time on searching than playing. Don't make buildings to large either, because it forces players to make lengthy detours. Small levels with small buildings are far easier to memorise, so more time remains to engage your opponents.
Try to create buildings with a purpose: use them to create interesting battle areas, escape routes, short cuts and blockades. Never add buildings to just 'fill up space'. Should you find yourself having a hard time filling your map, you should consider decreasing the size of your map. Many large maps can be turned into good smaller maps by simply deleting uninteresting and boring areas and piecing together the remaining areas.
Design and style
The importance of the looks of your level mostly depends on the type of map and personal taste. Fast paced arena styled maps don't require much detail, while larger themed maps may benefit from carefully designed environments.
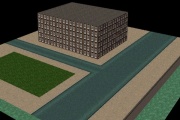
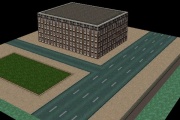
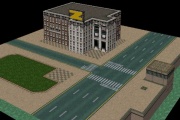
Still, even if you choose not to add much detail to your map, detail can greatly enhance gameplay. By neatly finishing roof edges, adding wall edges, using correct tiles and maintaining a certain 'style' your map will feel more 'natural'. If players aren't distracted by things like awkward simplistic buildings or wrongly used tiles they're less likely to miss other less important details. Take a look at these screenshots.
The first picture depicts a very basic scene. It lacks neatly finished edges, which causes the map to feel very 'fake'. It the middle picture, these missing edges have been added. It's still the same boring building, but this isn't as apparent as in the previous picture and players will probably won't pay much attention to it. In the last picture, more details have been added, which will attract the players attention.
Lay-out
Try to create diverse environments with interesting road networks, to help players remember locations and navigate through your map. A well designed road network covers the whole map, so players always have easy access to a car. This also prevents areas from becoming isolated from the rest of the map. But don't make your map to complicated either, or players will have trouble orientating and will get lost. Remember: you may know exactly what your map looks like, but other players won't! If they get lost the first time they play your map, chances are they won't even try a second time to get to know it. To help players navigate, you can add recognisable buildings, a ring road which is easily found throughout the map, area names, and much more. Including a street map with the download is also a good idea.
Avoid making dead ends like blocked alleyways or long piers. Weapons and power-ups are sometimes placed at dead ends (like the rocket launcher in Tiny Town). Because players don't want to get trapped, they rarely enter a dead end without a very good reason (to get a powerful weapon that isn't easily acquired somewhere else, for example). Even then, they rather don't because it takes valuable time to enter and leave the dead end. Consider making multiple ways to enter and leave each location in your map.
Make sure the spawn points (both at the start as when respawning) are well balanced, so all players have equal chances. This means all spawn points should be at about the same distance from weapons, roads, etc. An example of unbalanced spawn points is Tiny Town, in which player 2 has access to several fast cars and therefore several powerful weapons, whereas player 1 has not. Don't place spawn points in the middle of nowhere, which requires players to walk a mile before they can get on with the game, but don't place them at the center of a battle zone either, as this will encourage spawn killing. Ideally spawn points are located within a reasonable distance of a road and at least one weapon, but in a somewhat quiet part of the map that is less frequently passed by the other players.
Weapon placement
When the game starts, the first thing players do is picking up weapons. Players who don't know where they can find weapons have a big disadvantage, so aid them by placing weapons at logical, visible locations. Many modders tend to 'hide' weapons, by placing them at locations which are difficult to find or reach. Although this may be a nice reward for skilled players who take the effort to find them, it generally causes the weapon to not be used at all.
This is why it's better to place weapons at locations where players are likely to spot them during the game. It's not a bad idea to make popular weapons like the flame thrower and rocket launcher harder to reach than weaker weapons, but don't overdo it. An example of a well placed weapon is the flame thrower in Tiny Town: it's harder to reach than most weapons, but it's still easy to spot from the road below it.
This also works vice versa: it's a good idea to place unpopular weapons like molotov cocktails or the shotgun in areas that are frequently passed by players. This causes them to be used more, bringing more variation in your level.
It's also good to realise the impact certain weapons and power-ups may have on your level. Game play in a level may change completely by adding or removing an easy to reach rocket launcher. Make sure players are able to counter the attacks of their opponents. For example, it is very hard to fight off someone with vehicle machine guns if there are no vehicle mines or rocket launchers available.
Power-ups like invulnerability* and invisibility can slow a level down and should be used with caution.
| Mapping | Map Editor · Buildings · Roads · Water & animations · Slopes · Flat tiles · Collision info · Level edge · Zones · Putting a level ingame | |
|---|---|---|
| Scripting | Declarering: | Main script · Script Compiler · Code lists · Commands · Vehicles · Objects · Sounds · Characters |
| Programming: | IF · WHILE · COUNTERs · Subroutines · THREAD TRIGGERs · Kill Frenzies | |
| Both | Manual · Lighting · Car shops · Cranes & crushers · Gangs · Subway · Multiplayer levels | |
| File types | .gci · .gmp · .gxt · .mis · .mmp · .scr · .seq · .tmp · .sty | |
| Other | Texting · Physics · Creating vehicles · Terminology · Installing levels | |


